- What are the three components required for a client-side imagemap?
- What question is answered inside the
<MAP> </MAP>container of a client-side imagemap? - Where does the
USEMAPattribute go, for a client-side imagemap? - What is the symbol
#called? - In an imagemap, you create a map and give it a name; then, you refer to this name. What tag is used to create the map?
- In an imagemap, you create a map and give it a name; then, you refer to this name. Suppose a map
is named "circle_map", and you want to apply this map to the image "circle.gif". Write the
IMGtag to do this. - What is the purpose of the
<AREA>tag inside the<MAP> </MAP>container? - Is the
AREAtag a container tag, or a stand-alone tag? - Suppose that an imagemap will have four "hot-spots". Then, how many
AREAwill there be inside the<MAP> </MAP>container? - The
SHAPEattribute inside theAREAtag was discussed like this:
SHAPE="rect|rectangle|circ|circle|poly|polygon"
What do the "|" symbols mean here? - What are the three possible shapes for "hot-spots" in a client-side imagemap?
- What is the purpose of the
TITLEattribute within theAREAtag for an imagemap? - What is often used as a
TITLEfor a hot-spot in an imagemap? - What attribute inside the
AREAfor an imagemap answers the question: Where should the user go if this region is clicked? - An
AREAtag for an imagemap should always have five attributes; what are these five attributes? - The
COORDSattribute inside theAREAtag gives the coordinates for each hot-spot. Fill in the blanks: all coordinates are given in , and are measured from the corner of the image being used for the imagemap. THE positive x-direction is ; the positive y-direction is . Also, all coordinates must be . - Consider this code:
SHAPE="rect" COORDS="x1,y1,x2,y2"
What is (x1,y1)? - Consider this code:
SHAPE="rect" COORDS="x1,y1,x2,y2"
What is (x2,y2)? - Consider this code:
SHAPE="circ" COORDS="x1,x2,x3"
What numbers give the center of the circle? - Consider this code:
SHAPE="circ" COORDS="x1,x2,x3"
What numbers give the radius of the circle? - Consider this code:
SHAPE="poly" COORDS="x1,x2,x3,x4,x5,x6"
How many vertices are there in polygon being described? What is the common name for the type of polygon being described? - Consider this code:
SHAPE="poly" COORDS="x1,x2,x3,x4,x5,x6,x7,x8"
How many vertices are there in polygon being described? What is the common name for the type of polygon being described? - Write the
SHAPE="" COORDS=""code to describe the rectangle in the image below, assuming each "grid" mark is 10 pixels.
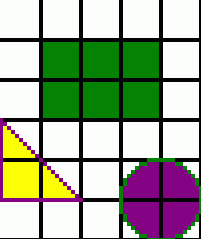
- Write the
SHAPE="" COORDS=""code to describe the circle in the image below, assuming each "grid" mark is 10 pixels.
- Write three different sets of
SHAPE="" COORDS=""code to describe the triangle in the image below, assuming each "grid" mark is 10 pixels.
Here are some steps to get you started:
- Copy the image into your personal folder.
- Create an HTML file that displays this image, sized with HEIGHT=419 and WIDTH=604.
- PRINT OUT a copy of the image, so that you have a hard-copy to measure.
- Measure the width of your print-out, in inches (say, 6.4").
- Measure from the left border to the center of the circle (say, 1.4").
- Set up a ratio to find out how many pixels, x, it is from the left border to the center of the circle:
6.4/604 = 1.4/x . Solving gives x = (1.4/6.4)*(604).which is about 132 pixels. - Mark all the pixel measurements that are needed, in pencil, on your print-out of the image.
- Create an imagemap, where the circle goes to "http://fishcaro.crosswinds.net", the triangle goes to your personal homepage, and the rectangle goes to "http://www.google.com".
- Make sure that you have appropriate TITLEs to give a clue to where each part of the image goes!

- Sheets containing pictures of the desired "hot-spots" will be passed out in class. There are four imagemaps that you are to create; these are worth 10 points each (40 points total).
- You may use any URLs you want for the hot-spots. I will be checking for accuracy of the hot-spot areas.
- The ORDER that you list the AREA tags may be important in creating some of these imagemaps! Remember: if hot-spots overlap, and a user clicks on the overlap area, then the FIRST area tag that includes the selected coordinates will be used.