Waltz, Phase I, Waltz Away And Together
Waltz Away and Together is simply Waltz Away immediately followed by Waltz Together. Since both halves have already been introduced separately, this lesson is intentionally brief.
Waltz Away is the first three beats: dancers move away from one another, holding inside hands, while turning outward. Waltz Away ends in a slight back-to-back (‘ V ’) position.
Waltz Together is the last three beats: dancers move back toward one another, finishing with feet closed.
Waltz Away And Together—In a Nutshell
Diagram Notation
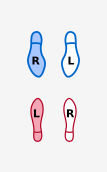
Foot Placement
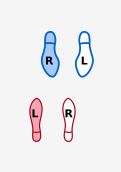
Foot Placement
Feet that are SHADED (blue or red) take weight.
Feet that are NOT SHADED (white interior) are free (without weight; free to move).
Simplified Foot Placement makes diagrams easier to understand for some people. Simplified Foot Placement is an instructional illustration only.
Correct Foot Placement shows foot positions actually used when dancing.
Figure Diagram Notes
Man’s lead foot is his left foot. He typically leads (starts moving) with that foot. Note that ‘lead’ rhymes with ‘reed’ in this context.
Woman’s lead foot is her right foot. She typically leads (starts moving) with that foot.
Common cue: ‘Lead foot free’ means that a dancer’s lead foot is free (without weight; free to move).
Individual Views
Couple Views
Waltz Away and Together is often entered from Butterfly Position. Butterfly Position has the same foot placement as Closed Position. However, in Butterfly Position, arms extend to the sides (like a butterfly), which more easily enables the Waltz Away and Together arm actions.
Notes
- The complete six-beat figure Waltz Away and Together consists of Waltz Away immediately followed by Waltz Together.
- Waltz Away and Together can begin with either free foot—it is determined by the current position and direction.
- If the two halves of Waltz Away and Together are separated by other figures, then Waltz Away and Waltz Together are cued separately.
Ready for More?
Feel comfortable with this lesson? Here’s more!
Curated Resources
See where ‘Waltz Away & Together’ fits among the standardized Waltz figures. Then, explore additional written and video sources for learning Waltz.
Kaye West: Waltz Figures and Sources for How to Dance Them
On page 1, find ‘Waltz Away & Together’ under Phase 1.