Waltz, Phase I, Box
Welcome! The Box is the quintessential Waltz figure. Its six steps trace the shape of a rectangle (or box) on the floor—a helpful way to remember the figure.
A step is a transfer of weight from one foot to the other. Because each step changes the supporting foot, an even number of steps returns you to the same foot you started on. Since the Box has six steps, the next figure begins with the same foot that started the Box. (So—while you’re learning—you could just keep dancing the Box over and over and over 😊)
The word waltz comes from the German walzen, meaning ‘to turn’ or ‘to roll’. Although the Box doesn’t turn, it helps establish the timing and movement that characterize Waltz.
Want some guidance on how you might use these lessons? Click ‘How to Use These Lessons’ at the top of any lesson page!
How to Use the ‘In a Nutshell’ Diagrams (below)
The ‘In a Nutshell’ diagrams give a quick overview of the figure, so you can see its general shape and how much room it takes up on the floor. Start with the gold-outlined feet, and follow the numbered arrows! Detailed step-by-step instructions and diagrams appear farther down this page.
Box—In a Nutshell
How to Use The Video Clips (below)
-
Find the cue to listen for—it’s just above the video, labeled ‘Cue’. You’ll hear this cue a few seconds after the clip starts, allowing you to see natural entries to the figure.
Cues are given just before the instructions are carried out. Why? It takes time for dancers to hear the cue and respond! Keep this in mind as you watch the clips: hear the cue first; see the figure immediately after.
- Move your mouse away from the video—this lets the YouTube controls disappear so you can see the feet more clearly.
- You don’t have to watch the video to its end! Click ‘Pause’ at any time, or click ‘Next’ to go to the next clip. Of course, if you want to watch more—enjoy!
- Notice the notes by the video control buttons—they give extra info about each clip.
- Watch more than one clip! Different dancers, camera angles, and cues give you practice recognizing the figure.
Diagram Notation
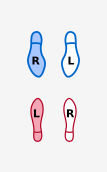
Foot Placement
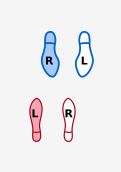
Foot Placement
Feet that are SHADED (blue or red) take weight.
Feet that are NOT SHADED (white interior) are free (without weight; free to move).
Simplified Foot Placement makes diagrams easier to understand for some people. Simplified Foot Placement is an instructional illustration only.
Correct Foot Placement shows foot positions actually used when dancing.
Figure Diagram Notes
Man’s lead foot is his left foot. He typically leads (starts moving) with that foot. Note that ‘lead’ rhymes with ‘reed’ in this context.
Woman’s lead foot is her right foot. She typically leads (starts moving) with that foot.
Common cue: ‘Lead foot free’ means that a dancer’s lead foot is free (without weight; free to move).
Individual Views
Couple Views
Closed Position has partners facing each other. Therefore, when the Man (Lead) steps forward, the Woman (Follow) steps back. Notice that they use opposite footwork.
Simplified foot placement shows feet directly opposite each other, making diagrams easier to understand for some people. Simplified foot placement is an instructional illustration only.
In actual dance, each dancer’s right foot points between their partner’s feet (to avoid foot collisions).
Simplified is shown by default. If desired, click the Correct button.
Notes
- If danced in Open Position, woman’s first step is forward (matching man’s direction of movement).
- The cue ‘SIDE’ means that the moving foot finishes to the SIDE of the other foot. In the Waltz Box, the moving foot follows a (slightly curved) diagonal path to arrive at this side-by-side position.
Ready for More?
Feel comfortable with this lesson? Here’s more!
Curated Resources
On a personal note, I am especially grateful to Kaye for her thoughtful suggestions, constructive feedback, and generous guidance as I develop this website.