KNITTING NOTES FOR BEGINNERS
I've done a lot of crocheting throughout my life (mostly granny-square afghans),
but in August 2020 (at age 62), I decided to try knitting.
This page gives information and resources that have helped me.
EQUIPMENT TO GET STARTED
-
KNITTING NEEDLES
Wood knitting needles won't slip as much as metal.
I bought this inexpensive set to get me started.
(I didn't want to spend a lot of money on knitting tools until I knew it was something I would enjoy.)
-
YARN
Start knitting with super bulky yarn (size 6) and 9 mm needles.
A single-color yarn will help you see the stitches better.
Hometown Lion Brand yarn is inexpensive—don't use expensive yarns while learning.
(Note: This yarn was exactly the same price on Amazon and at my local Walmart.)
-
ACCESSORIES
I did splurge on two inexpensive accessories:
-
Knit-Chek:
Check knitting needle and crochet hook sizes;
centimeter/inches ruler;
gauge for rows and stitches per inch
-
Clover Stitch/Row Counter:
Can be inserted onto a straight knitting needle
-
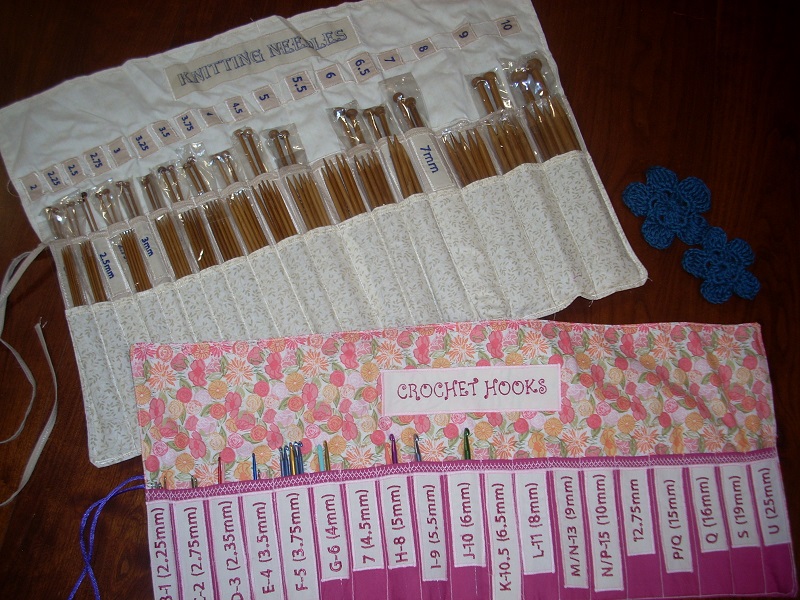
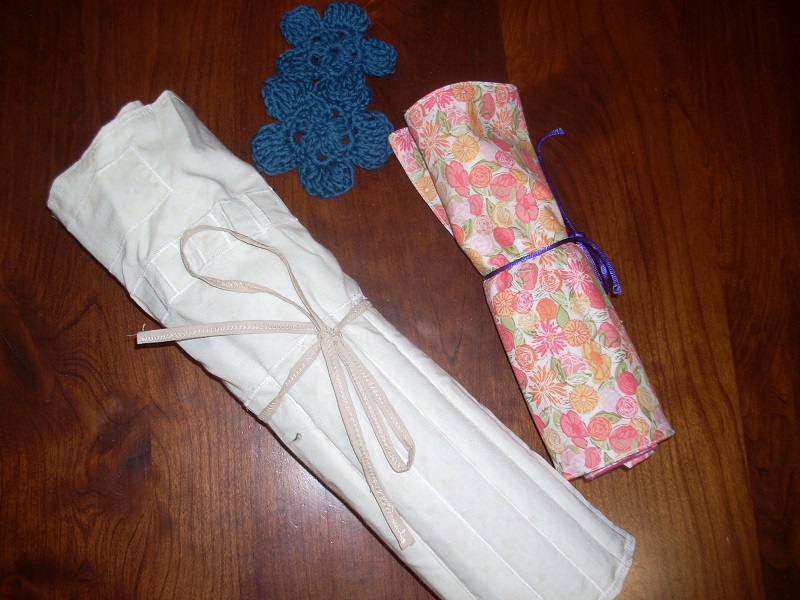
NEEDLE HOLDERS
I made myself both a knitting needle and crochet hook holder (see right),
based on this free online pattern:
DIY Roll-Up Knitting Needle Case
The labels were made with my embroidery machine.
|
|
|
TIPS
-
Keeping Knitting Needles Together:
Foam pencil grips (or rubber bands) are good for keeping a (small-size) pair of same-size knitting needles together, when not in use.
-
Prevent Dangling Thread in Partially-Used Yarn:
I use
small binder clips to hold the yarn
on a partially-used ball/skein that is not currently in use.
-
Keep Yarn Information Close By:
When I open a new batch of yarn, I fold up the label and tuck it ‘inside’ the yarn.
This way, I'll always have the
information about that particular yarn close by.
BASIC TECHNIQUES
Many of the ‘total beginner’ videos did not work well for me.
Trying to follow their methods, my first row of stitches (and subsequent rows) would twist all around my needle.
I finally was able to solve my issues with the links below.
-
CASTING ON (total video length is 14:27; casting on is from 2:08 to 5:15)
Using the methods on this video, I finally achieved a straight, clean, first row of cast-on stitches:
-
MAKE A SLIP KNOT (2:40 to 3:28)
Pull some yarn from your ball/skein of yarn. (On a new skein, the yarn is often stuck in one end.)
There are two ‘sides/ends’ to the yarn you are holding: the loose end (in your hand), and the other (attached to the ball/skein).
Working yarn: the side/end attached to the yarn ball.
Tail: the loose end.
The tail is on the LEFT when you make the loop around the two fingers of your left hand.
Pulling on the working yarn (not the tail) should tighten the slip knot.
Why? You don't want pulling on your ‘tail’ to tighten your stitches, since you could inadvertently pull on
the tail at some future time.
-
CASTING ON (3:28 to 5:15)
She shows the single cast-on. It is the simplest (but not the neatest/prettiest) cast-on.
Note: For casting on, the working yarn should be on the LEFT.
A ridge of stitches forms on the left side of the needle.
-
ROTATING THE NEEDLE AROUND AFTER CASTING ON
When you're done casting on, you have a ‘ridge’ of stitches on the left side of your needle.
To start knitting, you need that ridge (and the ball of yarn) on the RIGHT.
With the needle in place, just rotate it (roll it between the thumb and first finger of your right hand) 180° to the left.
The ridge travels around the back, and ends up on the right side.
Then (as needed), pick up your yarn and move it to the right.
-
KNIT STITCH
(8:04, by Sheep & Stitch)
ROW #1:
The row of stitches should form between the needles; that is, on the left side of the right needle.
Make sure the row of stitches stays straight.
When the first row is done, I like to very lightly take the tail in my left hand, the working yarn in my right hand, and pull gently.
Don't worry if the last stitch is a bit loose; it will tighten up as you begin the next row.
Now, we need to move that row of stitches to the RIGHT to begin knitting row #2.
As before, rotate in place 180°, and make sure the working yarn is off to the right.
The tail is now at the top; it should be pulled to the rear (and slightly left) so it doesn't get mixed up with your working yarn on the next row!
ROW #2:
Knit the second row, as before, keeping the stitches straight and between the needles.
When done, your rows of stitching are on the left of the needle (and the tail is at the bottom left).
Rotate as before to move the rows of stitching to the right.
Repeat as needed.
-
PURL STITCH
(8:06, by Sheep & Stitch)
Her phrase ‘from top to bottom’ actually makes more sense to me as ‘from back to front’.
The phrase ‘going into the stitch purl-wise’ is also used in other situations.
Textures of Knit versus Purl Stitches: 6:04 to 6:20
Purl stitch looks like a little bump—like a pearl!
Knit stitch looks like a little V.
Garter Stitch: 6:51 to 7:06
Knitting every stitch in every row produces the so-called garter stitch.
Since you flip your work (right-to-wrong side, or wrong-to-right side) after each row,
this actually produces alternating rows of knits (valleys/flat parts)
and purls (bumps/ridges).
-
BIND OFF (or CAST OFF)
(5:12, by Sheep & Stitch)
STITCH PATTERNS
I tried this stitch pattern multiple times, using various instructional sources, and it kept coming out wrong.
Finally, I found a video that clearly showed the steps I was missing, and now my stitches look correct!
-
Key Concept:
When knitting a stitch, the yarn must always start at the back of the work.
When purling a stitch, the yarn must always start at the front of the work.
So:
- After you knit, you must pull the yarn to the front before you purl the next stitch.
- After you purl, you must pull the yarn to the back before you knit the next stitch.
- When pulling the yarn to front/back, it always travels in between the two knitting needles.
My Mantra:
I say this over and over and over again as I stitch:
Knit ... pull yarn thru middle to front ...
Purl ... pull yarn thru middle to back ...
(After the very last stitch in a row, you don't re-locate the working yarn.
It should end up in the correct position after you rotate your work.)
Knit the knit; Purl the Purl (2:38 to 4:05)
As you continue adding new rows, you can stop thinking about when you should knit/purl.
Instead, just look at your work—it will ‘tell you’ which stitch you should be doing!
You will need to recognize the so-called ‘purl bump’.
She investigates the emerging stitch pattern at 7:00.
Note: In the
Vogue Ultimate Knitting Book, it says you should use an odd number of
stitches for Knit 1, Purl 1 Ribbing.
JOINING YARNS
I inherited lots of short pieces of yarns.
This gave me plenty of practice with methods for joining yarns!
I love the following two methods, since they don't require working in any pieces of dangling yarn at the end:
Here's a great collection of yarn-joining techniques.
|
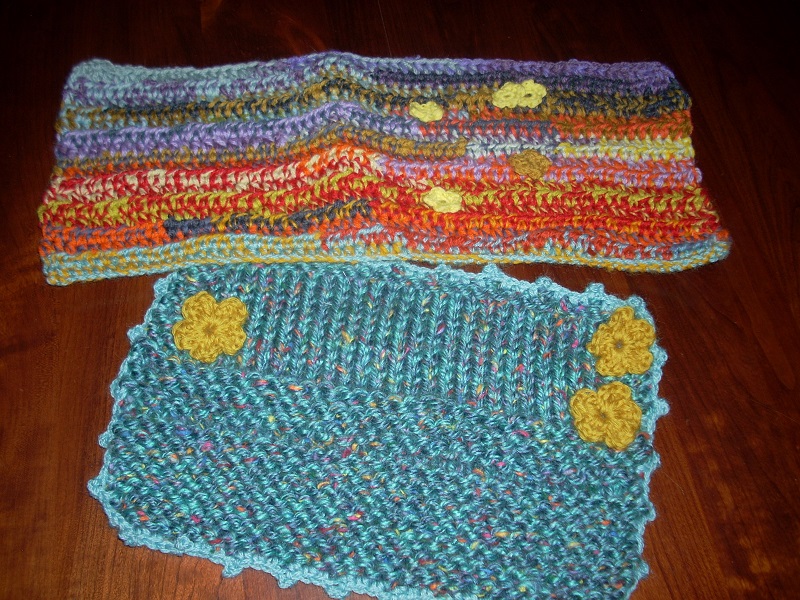
Top: Practice joining yarns (crocheted)
Bottom: My first knitting attempt (with crocheted border)
|
ONLINE PATTERNS, MORE
-
Teeny Tiny Crocheted Flowers
You can use these to cover up small goofs in beginning efforts!
After crocheting the tiny flower:
-
Take the two yarn ends and tie a couple square knots to secure (but do NOT trim yet).
-
Using a crochet hook, weave one of the loose ends over to the ‘other side’ of the flower.
-
Attach to knitting:
Using a crochet hook, pull both of the ‘flower loose ends’ through the knitting (in a correct location to cover up the goof).
-
Tie the loose ends with a couple square knots on the back, and trim the excess yarn.
-
Here's another tiny crocheted flower (YouTube, 4:21).
This one is perfect for beginners, since it's super-easy to see what stitch you're crocheting into!
-
How to Crochet the Magic Loop (Magic Circle) (YouTube, 3:59)
This is a great technique for starting any crochet project (like most flowers) that are worked in-the-round.
Another Magic Circle Tutorial (YouTube, 6:55)
Notice how she puts her stitches over both the yarn tail and the magic circle; this ‘secures‘ the yarn tail.
-
Frog and Toad (for when I'm a more advanced knitter)
-
I love flowers, so couldn't pass this up when I stumbled on it:
100 Flowers to Knit and Crochet (actually, some leaves and insects are part of the 100)
100% cotton sampler yarn (lots of colors for my flowers)
-
Basic Crochet Stitches:
yo = yarn over
-
triple/treble crochet (YouTube, 3:41)
yo twice (3 loops on hook);
insert hook into desired stitch and pull up yarn (4 loops);
yo, thru 2 (3 loops remain);
yo, thru 2 (2 loops remain);
yo, thru 2 (finished)
Motivation for name: yarn over and pull thru two THREE times
-
three stitch treble cluster (YouTube, 1:11)
-
half double crochet (YouTube, 3:32)
Wrap yarn, insert hook, yo (3 loops on hook); yo, thru all 3 loops.
SOCKS
One reason I'm learning to knit is to make socks for my husband.
He had socks he loved—it was the only kind he would wear—and he can't get them any more.
She uses medium weight yarn (size 4) for the videos below.
-
How to Knit Socks for Beginners, Part 1 of 3 (YouTube, 31:50)
Here, she makes a heel using the German Short Row method, in real time.
Yes, real time! She keeps the camera on
her work from start to finish, which is exactly what I need!
Note: I used a 5.5mm needle.
You'll be returning to these instructions after knitting the toe and body of the sock.
- 0:00 to 4:00: Intro
-
CAST ON
4:00 to 5:13: Cast on 20 stitches (this will correspond to the last knit row of your sock body)
-
($\,\dagger\,$) Begin heel
KNIT ROW; TURN
(This symbol is called a ‘dagger’, and will be referred to below.)
5:13 to 6:40: Knit all stitches, turn work.
-
CREATE A PURL FUNKY STITCH
6:40 to 7:41:
You're now on the purl (bumpy) side of work.
‘Create a Purl funky stitch’ as follows:
Make sure yarn is in front.
Slip first stitch purlwise.
Pull up on working yarn—you should see two strands.
Wrap yarn around needle (back-to-front); you now have three strands.
-
PURL, TURN
7:41 to 8:50:
Purl all stitches; turn work.
-
CREATE A KNIT FUNKY STITCH
8:50 to 9:33:
You're now on the knit (smooth) side of work.
‘Create a Knit funky stitch’ as follows:
Make sure yarn is in front.
Slip first stitch purlwise.
Pull up on working yarn (2 strands).
-
KNIT UP TO FUNKY, TURN
9:33 to 10:36:
Knit just UP TO the funky/double stitch.
Do NOT knit the funky stitch!
Turn work.
-
10:36 to 21:00:
Continue, as follows, until 6 funky stitches on both ends:
Create a purl funky stitch; purl up to funky; turn.
Create a knit funky stitch; knit up to funky; turn.
Once you have six funky stitches on the knit side, do NOT turn: continue as follows.
-
SECOND HALF OF HEEL
21:00 to 22:00: Knit TWO funky stitches (treating the ‘double’ stitch as a single stitch); turn.
(A) 22:00 to 23:20: Create a purl funky stitch; purl up to funky stitches; purl TWO funky stitches; turn.
(B) 23:20 to 24:26: Create a knit funky stitch; knit up to funky stitches; knit TWO funky stitches; turn.
24:26 to 30:17: Repeat (A) and (B) until all stitches are on one needle (with two funky stitches at end).
- ($\,\ddagger\,$) End Heel
-
Before the next video, I needed help with the KFB (Knit-Front-Back) increase:
4 Steps to KFB Knit Front and Back for Beginners
-
How to Knit Socks for Beginners, Part 2 of 3 (YouTube, 39:42)
Sew the toe, using Judy's Magic Cast-On with Magic Loop.
Note: I used a 29", 5.5mm, circular needle.
T = yarn tail
W = working yarn (connected to ball/skein)
- 2:00: Stitch Marker (or paper clip, bobby pin) optionally needed for later step, to mark front/back.
- 2:15 to 3:15: Determine number of stitches to cast on to each needle.
- 3:25 to 4:02: Here's what the toe will look like on your needles.
-
JUDY'S MAGIC CAST ON (4:10 to 9:25)
- Hold two needles together, pointing left, with connecting loop on right.
-
Yarn over back needle only (under front needle); enough length for a long tail cast-on;
T on left, W on right.
Note: This counts as the first Thumb loop (see below).
-
5:54 shows her finger/thumb holding position.
(I'll call this hand position S for Start position.)
- T (Thumb yarn) always goes over back needle.
- W (Finger yarn) always goes over Front needle.
- Finger yarn goes under both needles, over front needle and down thru middle, return to S, making a loop on the front needle.
- Thumb yarn goes up thru middle, over back needle, return to S, making a loop on the back needle.
- My Mantra: [Thumb up between, Finger under over thru] (repeat); until 10 stitches on each needle.
-
Turn and Knit First Row (9:35 to 12:38)
-
Rotate needles 180°, making sure purl bumps are on back.
Wrap T around W and hold T with left hand.
-
On front needle (closest to you):
Slide loops left onto flexible center;
this is called pulling the needle.
-
Knit all stitches on rigid needle.
-
Turn and Knit Second Row (12:38 to 14:20)
- Drop empty needle, rotate needles to right, with flexible part on top.
- Slide top stitches onto rigid part of needle.
-
Pull the bottom needle.
Note: This is the needle with W attached—you will always pull the needle with W attached!
This is abbreviated as: Pull the working needle.
- Knit all stitches on rigid needle.
FIRST ROUND COMPLETE
Knitting all the stitches on both needles is called a round.
Whenever T is on the right, you've completed a round!
-
Turn and Increase 2 [TI2] for Third Row (14:20 to 18:02)
- Drop empty needle, rotate needles to right, making sure flexible part is on top.
- Slide top stitches onto rigid part of needle.
- Pull the working needle.
-
Note: We will increase the first and last stitch on each needle,
giving a total of 4 increased stitches per round.
- KFB (Knit Front Back) for first and last stitch; knit all others.
-
18:02 to 21:15: TI2 for Fourth Row
Check that you now have 12 stitches on each needle.
SECOND ROUND COMPLETE
Note: After you knit a few rows, the working needle should be changed from front to back.
She shows this at 18:50: now, you're looking at the loops from above.
-
23:10: (Optional) Insert stitch marker
-
23:50 to 33:10: Alterate KNIT rounds and INCREASE rounds until there are 20 stitches on each needle.
-
KNIT ALL ROWS UNTIL YOU HAVE LENGTH OF FOOT (33:10 to 34:58)
At 33:30, she shows a ‘palm to tip of middle finger’ trick for knowing when you have the proper length.
-
HEEL (34:58 to end)
-
34:58 to 36.13: Must start heel on a new round; pull back needle; knit all stitches; turn work.
-
36:13 to 37:16: Pretend stitches on flexible cord do not exist!
Do ($\,\dagger\,$) to ($\,\ddagger\,$) above to create heel, until all stitches are on one needle with two funky stitches at end.
-
37:16 to end: Start knitting in the round again with magic loop.
Knit a desired number of rows (the leg) before beginning the cuff (next video).
-
How to Knit Socks for Beginners, Part 3 of 3 (YouTube, 22:36, but I only use the first part)
- 0:00 to 2:14: Intro
-
2:14 to 7:10:
RIBBING (CUFF):
Yarn in back, knit 2.
Yarn in front, purl 2.
Repeat to end; turn.
Repeat to desired height of cuff.
-
In order to use the bind-off shown next, knit a full row (both needles).
(I feel that the bind-off from both knit and purl stitches is too complicated for a beginner.)
-
BIND OFF:
Jeny's Surprisingly Stretchy Bind-off (YouTube, 6:23)
- 0:00 to 0:40: Intro
- 0:40 to 0:45: Knit 1
- 0:45 to 1:07: Bring working yarn over BACK of needle for yarn-over.
-
1:07 to 1:17: Knit 1.
Now there are 3 loops on right needle: number them 1 (farthest from end), 2, and 3.
-
1:17 to 1:32:
Using point of left needle, pull loops 1 and 2 over loop 3.
(Alternatively, do in two steps: 2 over 3, then 1 over 3.)
She calls this ‘1 and 2 hop over 3’.
This binds off the first stitch.
-
1:32 to 4:49: continue to end of row.
(You would then turn work, pull needle, do other side.)
-
4:49 to end:
One stitch remains on needle.
Cut thread, pull through loop and tighten.
Weave in end.