On this worksheet, you are only given hints to various GeoGebra
operations.
You will need to figure out how to do some things yourself!
This worksheet assumes you have the level of knowledge and experience with GeoGebra
that is provided in:
GeoGebra Tutorial: Introduction to GeoGebra
GeoGebra Worksheet: Triangles
GeoGebra Tutorial: GeoGebra Basics
GeoGebra Worksheet: Quadrilaterals
GeoGebra Worksheet:
COPYING
A LINE SEGMENT
AND AN ANGLE
GeoGebra an be used to ‘simulate’ a hand construction, by using only the
circle and segment tools.
This worksheet shows you how.
COPYING A LINE SEGMENT
- Uncheck VIEW-AXES.
- Select OPTIONS-LABELING-NEW POINTS ONLY, so that only new points will be labeled.
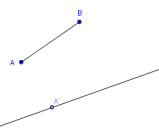
- Create a segment to copy, and make sure the endpoints are named $\,A\,$ and $\,B\,.$
Note: Using the ‘Segment between Two Points’ tool automatically generates
a variable that gives you the length of the segment—you'll want this in a future step.
- Create a line to hold the copy of the segment.
Hide the two points used to create this line.
- Put a point on your line; this will be an endpoint of your copied segment.
Rename this point $\,A'\,.$
You should now be looking at something like this:
- Use the ‘Circle with center and radius’ tool to construct a
circle with center $\,A'\,,$ and radius equal to the length of your original segment.
(You may need to figure out what GeoGebra is calling the length of your original segment.)
-
Create the intersection point of this circle with the line containing $\,A'\,.$
Rename this intersection point $\,B'\,.$
-
Hide the line $\,\overleftrightarrow{A'B'}\,$ and the circle.
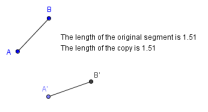
Create the line segment from $\,A'\,$ to $\,B'\,.$
Change the length of the original segment, and make sure the copy follows accordingly!
- Create the dynamic text shown below.
Make sure you use the correct GeoGebra variables
for the lengths of $\,\overline{AB}\,$ and $\,\overline{A'B'}\,.$
COPYING AN ANGLE
- Select FILE-NEW to start a new drawing.
- Uncheck VIEW-AXES.
- Select OPTIONS-LABELING-NEW POINTS ONLY.
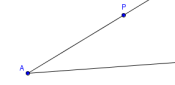
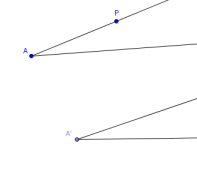
- Use the ray tool to create an angle to copy.
The vertex should be labeled $\,A\,.$
The point on the upper side should be renamed $\,P\,$;
this point will be used later to change the original angle.
Hide the point on the lower side.
You should be looking at something like this:
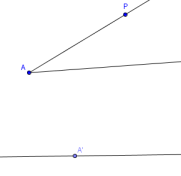
- Create a line to hold one side of the copy of the angle.
Hide the two points used to create this line.
Put a point on this line; this will be the vertex of the copied angle.
Label this new vertex $\,A'\,.$
You should now be looking at something like this:
-
Pick an appropriate radius (say, $\,2\,$) and use the ‘Circle with center
and radius’ tool to construct a circle with center $\,A\,.$
Use the same radius to construct a circle with center $\,A'\,.$
You should now be looking at something like this:
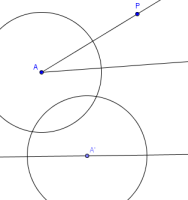
-
Create the intersection points $\,E\,,$ $\,F\,,$ and $\,G\,$ shown below:
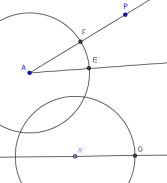
-
In the ‘Input:’ field, type:
r = distance[E,F]
and press ENTER.
You are finding the distance from $\,E\,$ to $\,F\,,$
and calling it $\,r\,.$
(In a hand construction, you would use your compass to transfer this distance.)
- Use the ‘Circle with center and radius’ tool to create the
circle with center $\,G\,$ and radius $\,r\,.$
-
Create the intersection point $\,H\,$ shown below:
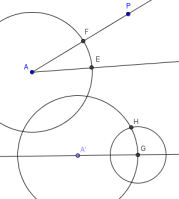
-
Construct your copied angle.
Clean everything up, hiding all auxiliary objects.
Make sure that as you move point $\,P\,,$ your copied angle follows accordingly!
When you're done with this worksheet,
move on to:
GeoGebra Worksheet: Bisecting an Angle