Dr. Carol J.V. Fisher's Homepage
New to GeoGebra? You may want to study this first:
Introduction to GeoGebra
GeoGebra Worksheet: TRIANGLES
- BE PATIENT!
It may take a while for GeoGebra to load
in the right-hand window.
- Once GeoGebra has loaded, select View-Axes from the MENU to uncheck the axes
(i.e.,
make the axes disappear).
-
On the toolbar, click the POINT tool.
(Notice the instructions on using the POINT tool that appear to the right of the toolbar.)
In the geometry window, create three points
(A, B, and C).
Henceforward, these instructions will be shortened to:
Create three points (A, B, and C).
Notice the highlighting around the POINT tool; this means that it is the active tool.
The active tool determines what happens when you click in the geometry window.
-
Notice that the points and their coordinates appear as Free objects
in the algebra window.
A free object is one that you are free to move around; it is not dependent
on anything else.
- If you ever goof anything up in this worksheet, you can
select Edit-Undo from the MENU to undo things.
Try it now:
Click in the geometry window.
Since the POINT tool is still active,
you'll get another point.
You don't want this point;
Edit-Undo to make it disappear.
(Or, use the shortcut undo/redo tools in the upper right of the GeoGebra window.)
- On the toolbar, click the MOVE tool.
Move each of the points around a bit.
(Experiment; you may need to hold down a left-mouse button to move things.)
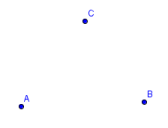
Try to arrange the points so that they form the vertices of an equilateral triangle (a
triangle where all the sides have the same length).
Your drawing pad should look like this (make sure the points A, B, and C
are in the same locations as this picture):
- On the toolbar, make the SEGMENT tool active, as follows:
In the bottom right corner of the LINE tool, there is a small arrow; click on it
to get a drop-down menu.
From this drop-down menu, select the SEGMENT tool.
Henceforward, these instructions
will be shortened to:
Select the SEGMENT tool.
-
Click on A and then B;
click on B and then C;
click on C and then A.
Your drawing pad should look like this:
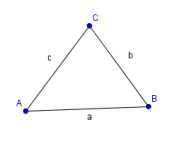 Notice how the sides were automatically labeled a , b ,
and c , and they are now listed, together with their lengths,
under Dependent objects in the algebra window.
Notice how the sides were automatically labeled a , b ,
and c , and they are now listed, together with their lengths,
under Dependent objects in the algebra window.
A dependent object depends on something else.
In this case, the length of the sides depends on the position of the points.
-
The labeling of the sides is a bit annoying; usually, we want side b
opposite point B, and so on.
So, we're going to rename the sides of the triangle.
In the algebra window, right-click on c , and select Rename
from the drop-down menu.
Type in b (lowercase) and click Apply.
Notice what happened: there was already a side named b , and GeoGebra
won't allow two different objects to have the same name. So, it renamed the other
side as b1 .
Henceforward, these instructions will be shortened to:
Rename c as b .
You should now be looking at something like this:
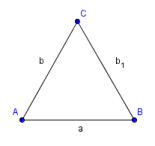
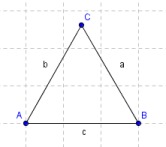
- Rename the other two sides appropriately.
-
MOVE the points around to try and make each side have length 3.
(It's not so easy, when you're working with two decimal place accuracy!)
-
See if this helps:
View-Grid to turn the grid on.
Now, move A to a grid point (an intersection of two lines); notice how it ‘clicks’
into place.
Then, move B three units away.
Then, just try to adjust C to make each side have length 3.
You should be looking at something like this:
- File-New to create a fresh start.
When asked if you want to save the current file, say NO.
- View-Grid to turn the grid off.
- Create three points (A, B, and C).
-
Select the POLYGON tool.
Click on A; then B; then C; then A again.
poly1 appears in the algebra window; the number indicates its area.
- MOVE the points
to try and make the polygon have area 6 .
(Turn on the grid if it helps; turn it off when you're done.)
-
Select the ANGLE tool.
Click on the polygon in the geometry window.
Notice how all three angles appear.
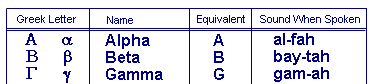
GeoGebra labels angles with lowercase Greek letters.
You should know the first three lowercase Greek letters: alpha, beta, and gamma:
 You should now be looking at something like this:
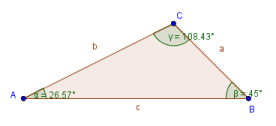 (Of course, your triangle and angles will be different.)
-
Click in the INPUT field.
Type: SUM=α+β+γ
You get the Greek letters (representing the angles) from the GREEK LETTER MENU.
You get the plus sign ‘+’ from the keyboard.
Press ENTER when you're done typing.
- Look in the algebra window.
You will see: SUM = 180°
MOVE the points around; watch the angles of your triangle change.
Is the sum of the angles changing?
Can you make a conjecture about the sum of the angles in any triangle?
- It would be nice to display this sum in the geometry window, instead of having
to keep looking over to the algebra window.
From the toolbar, select INSERT TEXT (it's under the SLIDER tool).
Click in the geometry window; a text box will appear.
Type EXACTLY what you see in the image below:
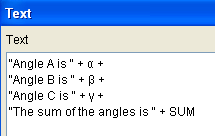 Click APPLY.
Characters inside the quotation marks are printed exactly as they appear.
The ‘+’ puts things together.
Thus, the words are being put together with the correct measurements.
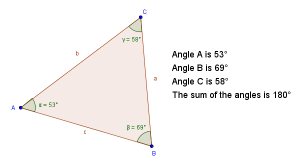
- Use the MOVE tool to move the text to a nice location on the screen.
Move the points around and watch the angles change; the sum remains constant.
- Right-click on the text box, and select PROPERTIES.
Under the TEXT tab, select size 18.
The text changes as you make selections in the PROPERTIES box.
Play around; change the color if you'd like.
Click CLOSE when you're done.
- With the MOVE tool active, adjust the label positions of the points and angles, if needed.
You don't want any overlapping labels.
- You should now be looking at something like this:
 Congratulations!
You've finished your first GeoGebra worksheet, and have been introduced to many
basic features of GeoGebra.
The next tutorial will firm up many of the concepts that were introduced
in this worksheet.
When you're done playing with GeoGebra,
move on to:
Segments, Rays, Angles